Shop

Friday, 29 March 2013

Tutorial: Fabric Petal Pouch

Let's begin. For this project I used Hideaway layer cake by Lauren + Jessi Jung and Sakura layer cake by Sentimental Studious for Moda. Layer Cake packs are great for this project because you do not need to cut the fabric if you are going to make a pouch as small as mine.


Step 1: Choose two pieces of fabric measuring 25cm x 25cm. Place the pieces right sides together and pin in place.

Step 2: Mark a 3cm wide gap in the middle of one side for turning. Sew together along the sides using a 1cm allowance. Do not forget to backstitch at the beginning and the end of the seam. Remove the pins.


Step 3: Cut off small corners. Turn the pouch right side out, carefully push out the corners. I use a chopstick for that.


Step 4: Iron. Sew the opening closed using the machine or using a ladder stitch by hand. To save the time I did mine using the machine. 


Step 5: Decide what side is going to be the inside of the pouch and what is going to be the outside. Place the pouch with the outside fabric facing up. Fold all four corners in and pin in place. In my case the inside of the pouch is going to be the fabric with pine trees and reindeers.


Step 6: Sew the corners in place along the folded edge using a 1cm allownce. Backstitch the beginning and the end of each seam. Remove the pins.


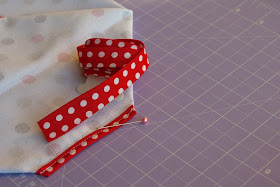
Step 7: Cut a piece of thin elastic cord about 20cm long. Using a safety pin, pull the cord through the casing. Bring the ends together, tighten and make a knot. Cut off the excess ends of the cord. The pouch is ready. Happy stitching!


Unexpected Project

I did not plan on sewing today, I did not want to come near my sewing machine at all. I was going to do some cross stitching instead and work a little bit on a couple of projects I planned a few weeks ago. Do not know why but I just had to make this Petal Pouch early in the morning. Did it ever happen to you?


While browsing the internet some time ago, I came across a photo of a small pouch. I did not pay much attention to it at that moment but today I felt like making one. So after playing around with some fabric I came up with my own way of sewing it. Many drawstring bags or pouches are made with a cord or ribbon but instead I used a thin elastic cord. This pouch is a cute way to keep an apple or a pear for your morning snack or it could be a creative gift wrapping idea. You can find a step by step tutorial here.

Tuesday, 26 March 2013

The Bird, the Oak and the Summer Forest

The cuckoo bird fabric envelope has been completed.


As I mentioned before, it takes me quite some time to decide on the fabric for the lining. This time I stopped on two choices - sky blue flowers with a hint of gold and brick red with white and orange flowers. Both fabrics look nice in combination with the bird embroidery but the blue one made me feel sad and melancholic for some reason.


The red one on the other hand had an opposite effect, it made me think of warm summer days and walks through forests in search of wild berries and flowers. So I decided to go with the red flowery fabric and I am quite happy with the result.


The envelope is big enough to fit a couple of books or maybe a notebook or a sketchbook and some pencils.


Saturday, 23 March 2013

Notebook Cover Finished

Remember acorns?


It took me such a long time to complete this small project. The stitching was finished more than a month  ago but the sewing process took much longer than expected. Well, the actual sewing took less than half an hour but getting my hands on this piece of work took a while. With so many ideas running through my head every day and so little time available for my hobby it's hard not to get distracted. But now it's done and ready to be sent away.


Thursday, 21 March 2013

Work in Progress

This sketch was made a while ago. It was supposed to be an illustration of a cuckoo bird for a poem written by my Mum back in 2003. It's one of the things on my "To Do" list to put together a book of Mum's poems and make illustrations for them. But it's a different story. Since I got interested in stitching, I also wanted somehow to use this sketch in one of my projects.


The bird is too big for a cover of a notebook but for a fabric envelope or maybe a heat pack should be just right. The process of stitching does not take long but the process of choosing the right fabric always takes me a bit of time because I cannot decide what fabric from my constantly growing stash to use first. Finally, last week, I had made my choice, so let's see how it turns out after all the work is finished.

Wednesday, 20 March 2013

Fabric Stash

The world of needlecraft and fabric magic is still all new to me but I already have built quite a stash of fabric.


I don't like shopping but shopping for fabric is a different experience all together. I can spend hours looking through countless shelves of fabrics. It's like being in a library but instead of reading the spines of books you "read" fabrics; I am sure each and one of them has its own story to tell. When you see a new print, you know instantly if you like it or not, you get this rush of energy and your imaginations starts running wild with all the ideas of how you can use this particular fabric in your future projects. The photos show just a small part of fat quarters I got the last time I went shopping... it's never enough.


Tuesday, 19 March 2013

More Easter Birds

A few more birds for the Easter Tree "arrived" last week. The combination of the baby pink and pale green with the delicate flowers and petals is really pleasant to my eyes. This fabric is Sakura Park by Sentimental Studios for Moda Fabrics.


It does not take long to sew the birds but it really is a fun and quick project and it's possible to do it even if you do not have a sewing machine. And what a great way to use all the scraps of fabric, lace and ribbons that you might have.

Sunday, 17 March 2013

Fabric Envelope

Do you take books with you when you go to work or a park? Do you carry around some papers or photos or maybe sewing material? Do you simply throw them in your bag?


I don't. I always put my books or papers in a small plastic folder before I put them in my handbag. I thought that it would be nice to have something special and of course handmade for that purpose. So I came up with the idea of this fabric envelope that can be easily sewn in any size; you can add a velcro or a magnetic snap fastener and it's a great way use up some leftover bits and pieces of fabric.

Meet Fedor the Bunny

Hi! My name is Fedor, and as you might have noticed, I am a Bunny. Not your ordinary type of a bunny that you can find in a forest or on a farm. I am a very sophisticated Super Duper Epically SAD Bunny. Yes, very very very very very SAD Bunny. Don't ask me why because I have no idea, this is simply the way I was born. Like my ears for example - you don't ask me why they are so long or floppy, you just accept them the way they are. So please accept me being sad all day every day and all year around. And please do not try making me laugh. It won't work. I promise. So don't waste your precious time on something as pointless as a joke or a funny story.


You might be wondering how old am I. Well, to tell you the truth I am not sure, sometimes I think that I was born already old. Not old old but something like 37 or 43 or maybe 51 or, who knows, even 79. Hmm... that sounds like a lot. But anyway, it does not really matter how old someone is; what matters is  how that someone feels deep deep inside his heart. And I have to tell you that I feel absolutely and totally young but... sad. Why? I don't know why.

Wednesday, 13 March 2013

From Paper to Fabric

I think on paper. Do you? I always carry with me a pen or a pencil and a small notebook. Now I carry a sketch book as well. When I have an idea or plenty things to do in a very limited time, I feel overwhelmed and my head gets "overpopulated" with too many unimportant and distracting thoughts. I feel a need to organise it. Once I put my ideas, plans, worries on paper, I feel much better and see more clearly what needs to be done and how. 

While having some soup at a cafe all by myself, I kept thinking about our family Easter Tree. The houses were finished already but I felt like something else was needed to be made, I kept going back to the idea of little birds. I got my sketch book out and in less than ten minutes I had a pattern for my birdie. The choice of fabrics and ribbon and even buttons was made at the same time. I just had to rush back home and test it. 


I am really happy with the final result. The pastel colours are so soft and sweet and attractive to me. I cannot wait to go "twigs picking" this year and fussing over our Tree while arranging the ornaments in a best possible way.


Birds and Houses

Traditions. Do you keep the traditions that used to run in your family? Or do you create your own? These small rituals that fill your life with extra warmth, love, happiness and laughter. When I was little, I spent every summer with my grandparents and on the day I arrived, my grandma would give me a handmade drawstring pouch filled with goodies. It was the best present ever because you never knew what colour the pouched would be and what you would find inside.


With the Easter season quickly approaching, I am making a few decorations for our Easter Tree. This is something still new to me and my family - making the Easter Tree. A couple of years ago me and my not so little boy came up with the idea of making a tree and decorating it with eggs and birds. The tree that we made that year turned out to be really beautiful. It was just a bunch of twigs arranged in a small sack and decorated with pastel eggs and birds. A year later we added some birdhouses to our ornament collection and from that day it became our new family tradition - making and decorating the Easter Tree. This year I am creating my own decorations. Today's project - cute fabric houses.


Friday, 8 March 2013

Tutorial: Bento Drawstring Lunch Bag

This Bento Lunch Bag holds a box that is about 11x15x5cm in size.


Step 1: Cut one rectangle 26cmx46cm from the fabric of your choice. Use a zigzag stitch to finish all four raw edges.

Step 2: Fold fabric in half with the right sides together. Mark 5cm from the top on both sides.

Step 3: Sew together along the sides using a 1cm allowance.


Step 4: Iron seams open. Pinch the bottom corners together, lining up the side and bottom (the middle line of the bottom of the bag) seams. Iron.

Step 5: Measure 4.5cm from the top of the corner and draw the sewing line on both sides. Sew. You can leave the corners as it is now or you can cut off the corners using a 1.5cm allowance and use the bias tape to finish the outside edges.


Step 6: Turn the bag the right side out. Work with one side at a time. Fold 1cm in from the top and iron. Then fold one more time all the way to the 5cm mark (the beginning of the side seam). Iron well. Repeat with he other side.

Step 7: Stitch in place along the bottom edge. I prefer to make a second seam just 2-4mm below the first one. This is going to be the casing for the cord.

Step 8: Cut two pieces of cord 67cm long each. Using a safety pin pull one cord through the casing until both ends re on the same side. Pull the second cord through so that the ends are on the opposite side of the bag.


Step 9: You can simply tie the ends together in a knot on each side or you can make a decorative fabric ends.

If you use this tutorial and publish pictures on your site, please link to it. If you have any questions, feel free to email me or leave a comment. I would love to hear from you.
Have fun!

Thursday, 7 March 2013

Sonic Library Bag

My not so little boy loves Sonic the Hedgehog and he needed a new library bag. At the same time I had to fulfil my sewing cravings. What a perfect match! I had a small embroidery of Sonic that was made some time ago for a different project that did not work out, so it was a great opportunity to use it now. After some time of thinking through the pattern and looking for the right fabrics, the final product was surprisingly cute.


Monday, 4 March 2013

Acorns

There is something magical and mysterious about acorns. Their little caps look like knitted hats of tiny forest creatures that are going to pop off any second and little heads with cute shy smiles will appear all around you. Don't you like them?


This is one of the projects in progress that is going to be finished soon, a small gift for someone who likes acorns as much as I do.

Sunglasses Case

For a long time I did not have a proper case for my sunglasses, I used a very thin drawstring bag that did not really protect the glasses inside the handbag. I wanted to make something different, something cute and simple at the same time and of course handmade. The owl started as a basic pencil sketch or better to say a scribble, then the pink tummy was added to make her look pretty and cheer her up a bit but she still looks a bit lost or maybe confused. Poor little thing.


Saturday, 2 March 2013

Drawstring Bento Bag

Do you take your lunch to work or a snack? I do, so as some of my friends. Where do you keep it? In a plastic or paper bag or maybe in a container? I used to carry my lunch in a plastic bag until one day, the day  I bought my sewing machine. I thought of something cute, reusable and practical, something that would put a smile on my face when it was time to eat my lunch. This is how I came up with the idea of making a drawstring bento bag. I like anything Japanese, all sorts of cute little things and these bento bags were just perfect. They are very quick and easy to make and do not require any special sewing skills.