


Welcome to our relaxed little sew-along! No stress, no rules - just a gentle, joyful time to slow down, play with fabric scraps and threads, and craft together. Don't forget to make yourself a cup of tea, switch on some soothing music or maybe a podcast you want to listen to and let's begin. 🤗
DAY 1
You might want to read the previous posts before starting working on your meditation scroll to get more information on where and how to start:


I like to keep one end of the strip nicely finished. This way it's easier to add a loop for a button for a closure later on. Since I am using an old tablecloth, the end is already stitched. But you can easily do that by simply fold the fabric 1/4" twice and stitch with 1/8" seam allowance along the folded edge on your machine or by hand.


MATERIALS
For the scroll
- A wooden or plastic spool (about 11/2" tall)
- A strip of cotton or linen for the base (about 24" long and as wide as the barrel without the rims)
- Fabric scraps
- A pair or two of sharp fabric scissors
- Embroidery floss, sewing threads, perle cotton
- A glue pen (a paper glue stick works just as well)
- Sharp sewing needles and pins
Optional
- One small button (optional)
- Stamps and fabric ink (optional)
Videos Tutorials:
Selecting a spool
A spool for your scroll can be any size. Just remember: large scrolls, need large fabric scraps and more time to complete, while small scrolls need small scraps and much less time. The spool can be wooden or plastic.
I highly recommend starting with a spool that is not taller than 2" and not shorter than 1". It's a perfect size to let you dive into this project/technique without being overwhelmed and without a need for many fabric scraps. You will quickly see if it makes you happy and if you want to spend more time on it.
My spool is 11/8" with the barrel 7/8".

Preparing the base fabric
Once you selected a spool you would like to use for your scroll, it's time to prepare the base fabric. Depending on the rip test, rip or cut a strip of fabric that is as wide as the barrel of the spool and about 24" long. For a harmonious base, consider using white or natural-toned fabric. This creates a clean canvas that lets your scrappy elements shine.
Simply lay the spool on the edge of the fabric, make a small cut with sharp scissors marking the width of the barrel. Then carefully rip (if the fabric is suitable for ripping) or cut with scissors a long strip about 24".

One side of my base fabric (an old tablecloth) has already been ripped before, and it shows a lovely frayed edge. You can see that the fabric fits nicely on the barrel of the spool.


NOTE: While some cotton’s loose weave makes them ideal for tearing into strips, not all fabrics cooperate easily. Tightly woven fabrics or blends may resist tearing - for these, sharp scissors will give you cleaner edges. Always test a small corner first to see how your fabric behaves.
I tried ripping this tightly woven cotton, but it did not work. As you can see, it went sideways instead of going straight. I had to use scissors instead.

Helpful video:
Once you ripped or cut your fabric, carefully pull away any loose threads along the edges. Make sure not to pull out too many threads, but just enough to give the edges a nice frayed effect if you like. Your scroll will look lovely without the frayed edges too.


Gently but firmly pull the fabric strip between your fingers trying to flatten it as much as you can and to stretch it as well if you ripped it. You can give it a gentle press with a warm iron instead if you like.


Preparing fabric scraps
Your scraps hold the magic - they are the heart and soul of your scroll! By now, you have likely gathered some little treasures and have a glimpse of an idea for your scroll. Remember, there is no need for perfection - just pick the scraps that sing to you. Choose scraps that will make you smile every time you unroll your finished meditation scroll. This is about your happiness, so choose what delights your heart.
When selecting fabric scraps for your meditation scroll, let your "why" guide you. Choose whimsical prints and text fabrics if you want to tell a story, or simply pull whatever scraps feel joyful for an easygoing creation. You might settle on a rainbow of colours or stick to a single soothing palette. There are no rules, only what resonates with you.
Let’s start by pressing all your precious scraps with a warm iron - this small step of care will keep your fabrics smooth and ready for cutting and stitching. There is something very satisfying about preparing your fabric, isn’t there? 😊
For my own scroll, I have gathered delightful prints from various Heather Ross collections - those tiny treasures too special to part with yet too small for big projects. I just know these snippets will make my heart flutter every time I unroll my meditation scroll.


Arranging the lovely scraps
Once you pressed your scraps, start the fun part of "telling your story". Before making any cuts, take a moment to play with your precious scraps. Arrange them on top of the base fabric in an order that feels just right to you - like putting together the pages of a scrapbook. 😊 Start by grouping only enough scraps to fill about 5" at a time. This way, you can stitch your scroll in small, mindful stages, enjoying each combination as you go and keep the scraps manageable.


There is no rush. Let the fabrics talk to you. Maybe one print naturally follows another, or perhaps a particular colour keeps catching your attention. Try to enjoy this stage of working on this scroll as much you can, playing with different combinations and arrangements.
TIPS:
- Focus on one beautiful fabric combination at a time
- Enjoy the meditative rhythm of steady progress
- Keep everything neatly organised as you work
Once you are happy with the order of the scraps, trim them if necessary and stitck them onto the base fabric overlapping them.

DAY 2
Adding lovely tiny stitches
Once you have put together a combination of scraps that is about 5" long, and you secured them with a dab of glue, it is time to add the tiny stitches. Please note that you can use plain glue stick, pins or large basting stitches instead of fabric glue pen.


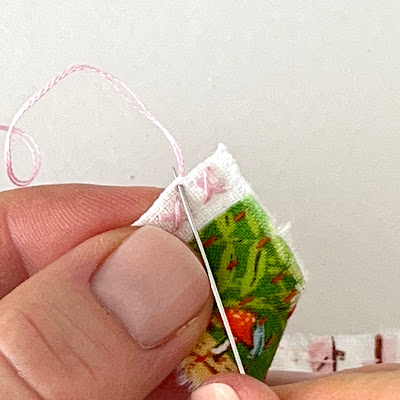
Choose floss colours that complement or contrast with your scraps - pull inspiration from the fabrics themselves or go with a single standout colour. There are no strict rules for stitching: experiment with running stitches, French knots, or any decorative stitches in rows, columns, or freeform patterns. I picked orange, pink, brown and green to complement the colours of this section of my scraps.

I started with one strand of orange floss. I prefer to use one strand of embroidery floss to keep the scroll's texture delicate. But if you like a more bold look and feel, use two strands. On the first piece I am adding running stitches in columns.


Pay attention to the areas where scraps overlap - add extra stitches there to secure the joints well. I used small crosses here.

Then I switched to pink floss and again used running stitches. They are quick and easy to add.


It's hard to see in the photo, but the tiny stitches give a lovely delicate crinkled texture to the scroll. I love how the colours and the airiness of the floss blend in with the precious scraps without overpowering them.

Embrace the imperfection of your stitches - the slight wonkiness adds handmade charm especially on the back of the scroll! Just keep your knots snug and tidy. The goal is to play with texture and colour, making each scroll uniquely yours!


Helpful video:
When you have finished one section, begin arranging the next 5" of scraps on your base fabric. Follow the same joyful process - gluing, stitching, reinforcing overlaps - until your scroll is filled with colour and texture. This isn’t a race! Let yourself enjoy each stitch. Work mindfully, with intention, so that every thread carries the quiet satisfaction of creation. Years from now, you will trace these stitches with your fingers and remember the calm, the colour, the joy of making this scroll.


DAY 3
Finishing your lovely scroll
Once you have filled the entire length of the base fabric with your precious scraps and finished stitching, you can add a button and loop for closure - though this is entirely optional. A decorative pin or a ribbon tie would work just fine. Personally, I love the satisfying action of buttoning and unbuttoning my scroll. 😊
To begin, stitch three small crosses at the very start of the scroll. You could also use straight stitches, French knots, or even tiny stamped designs. If you choose embroidery, be sure to hide the floss between the fabric layers so no stitches show on the back side of this part of the scroll.


After completing the last cross, slide the needle between the fabric layers and bring it out at the edge about one-third from the top of the scroll.

Then push the needle in right next to where the floss comes out to create the starting loop.


Using a fine crochet hook, make a short chain. I am using two counts of DMC embroidery floss for this.


Make sure to check the length of the chain so the button can get through it.

Once your chain reaches the needed length, pull the floss through to secure the end. Thread it onto a needle, then insert the needle about 1/4" away from where your chain began. The ideal loop size will depend on both your scroll's dimensions and the button you have chosen. Make a knot on the back side and hide it between the layers.
One day, my Mum was making tea towels. She stitched them on her machine using special tea towel fabric and finished them with pretty handmade crochet trims. I loved watching her work her magic with threads and hooks, and sometimes she would give me small crafty tasks. This time, my job was to add crochet chain loops for hanging the tea towels.
I didn't have much experience with crochet, so I was working slowly when our neighbour dropped in on her way back from the shops for an afternoon tea. It was such a lovely tradition when neighbours and friends could pop by uninvited anytime. 😊 She saw me carefully pulling each stitch and showed me a clever trick: how to make the chains without a hook. With just a few swift finger movements, she had a chain ready in no time. I was mesmerised! It was fun!
Decades later, I still remember how she taught me. So if you don’t have a crochet hook, you can make a chain without one.
Here is how it’s done:


Now let's attach your scroll to the spool and add the button. Wrap the free end around your spool, overlapping by about 1/4". Secure it in place with a few straight stitches worked right through all layers from the bottom of the spool to the top. For the finishing touch, add your button - position it so your loop closes the scroll neatly when fastened.


I am absolutely thrilled to see how your Meditation Scrolls blossom! Tag me in your posts on Instagram by using the "Tag People" function to ensure that I find your post to admire your beautiful work and cheer you on. Also Use the hashtag: #stitchingnotesmeditationscroll 🤗
Since this tutorial does not have specific instructions, you might feel like you need more help, please feel free to contact me here or send me a direct message on Instagram so I can assist you further.
IMPORTANT: HOW TO SHARE YOUR PROGRESS
To make sure I don’t miss your beautiful work:
If your Instagram account is PUBLIC:
- Post your progress photos as usual
- Use the "Tag People" feature to tag @stitchingnotes directly in the photo
- Use the hashtag: #stitchingnotesmeditationscroll
- You are welcome to use hashtags #stitchingnotes or #stitchingnotespattern but these do not always show posts reliably or in chronological order that makes it almost impossible to see your posts in time
If your Instagram account is PRIVATE:
I won’t be able to see your posts, but please:
- Keep creating - your scroll is still special!
- DM me anytime for help or advice
- Or leave a comment here with questions

Happy stitching!
Larisa xo
These look so much fun to make, and I do enjoy some slow hand stitching in the evenings. Thanks for sharing the instructions!
ReplyDeleteYou are very welcome! It's such an easy and fun project. 😊
DeleteLove this and your work!!! Will try this 💖
ReplyDeleteThank you very much! Happy stitching! ❤️
DeleteIt's looks awesome... Nana
ReplyDeleteThank you! 😊
DeleteThank you! ❤️
ReplyDeleteThanks for the instructions ❤️. I used double sided glue tape (big mistake) and gummed up my needle. Small dots next time, LOL
ReplyDeleteJust meditative following the directions ! Thank-you☀️
ReplyDeleteOh such a soothing way to save the cutes scraps... And i do love the memory of having afternoon tea with good neighbour. Nana
ReplyDeleteI love you meditation scroll, thank you for this great tutorial! I keep an eye on SALs and other textile challenges that I post on my blog, and I'm sorry I missed this one. Also, I have a link party every week on Saturdays, so feel free to come and link a post. Hugs from France.
ReplyDeleteAn exhaust fan with flap is a ventilation device designed to remove stale air, smoke, and moisture from a room while incorporating a flap or shutter mechanism. Unlike conventional exhaust fans that leave the duct open when switched off, this design ensures that a flap automatically closes once the fan stops working.
ReplyDeletelove it
ReplyDeleteShop the Wallex Electric Ceiling Fan in Delhi for a perfect blend of style, durability, and powerful performance. Designed to deliver superior air circulation, Wallex fans are energy-efficient, quiet, and crafted to suit modern interiors. Whether you need a fan for your home, office, or commercial space, Wallex offers reliable cooling with sleek designs at affordable prices. Get the best deals and bring home comfort with Wallex Electric Ceiling Fans in Delhi today. | Call Now 1800-212-9001
ReplyDeleteSuccess in digital space is all about strategy and tracking. Designyze, a leading Digital Marketing Agency, ensures that every campaign is measurable and impactful.
ReplyDeleteWallex Ceiling fans are no longer just about circulating air—they combine efficient cooling performance with aesthetic appeal to complement contemporary interiors. With advanced motor technologies like BLDC, these fans consume less energy while delivering powerful airflow for maximum comfort. At the same time, sleek blade designs, premium finishes, and smart features like remote controls or IoT connectivity make them a stylish addition to living rooms, bedrooms, and offices. Today’s fans effortlessly strike a balance between functionality and design, ensuring your space stays cool while looking elegant.
ReplyDeleteYour detailed instructions make it easier to learn the "how to" to make a scroll. I love how they can be applied to any size scroll and your attention to the small details make it easier for the beginner to understand. Thank you for that!
ReplyDeleteThank you for your detailed tutorial. I've always wanted to make a meditation scroll, but was unsure how to do it. Your post was suggested to me on Pinterest. Your scroll and pictures are inspirational!
ReplyDeleteStay warm this season with the Wallex Fan Heater-Mini ❄️🔥 Compact, powerful, and designed for quick heating — perfect for bedrooms, offices, or any small space. Enjoy reliable warmth without heavy electricity usage. Winter Sale On Now! Call 1800-212-9001 to buy yours today and bring home instant comfort.
ReplyDeleteThanks for the idea!! Sweet, think Ill make one for my girls :)
ReplyDeleteWallex delivers powerful airflow and cool comfort designed to enhance your everyday living experience. Built with efficient motor technology and a sleek design, Wallex fans ensure consistent air circulation while maintaining quiet performance. Whether for home or office use, Wallex provides reliable cooling, energy efficiency, and long-lasting durability. For product details, support, or assistance, connect with Wallex at 1800-212-9001 and experience cooling that combines power with comfort.
ReplyDeleteThank you for your creation and instructions on how we can follow. I am returning novice at sewing (+30 years since practiced sewing). This looks like a wonderful project to get me started back into the hobby/skill. Small, focused, and full of joy. Linking this small project to meditation and happy scraps of fabric is an added bonus. I have saved and liked the page on Pinterest. I hope to share my creation with you soon!
ReplyDelete