A tiny bag that is ooh so easy to sew and fun to use. It really is very tiny but at the same time big enough to store a few small items. It would also make a lovely case for a gift for someone special. I have made quite a few of these so far and going to make a few more before Christmas. Did I say Christmas? Ooh... Is it too early?
Things you will need:
- medium weight cotton or linen for outer shell
- cotton for inner shell
- medium weight interfacing (I am using Vilene Decovil I Light. If you can get some, it would be the best choice)
- template (provided at the bottom of the page)
- a piece of ribbon
- sewing accessories
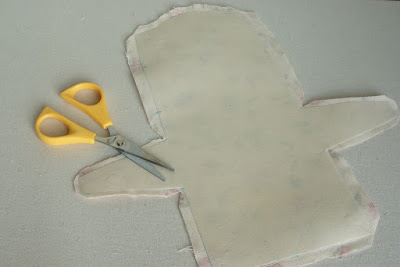
Step 1: Print out the template provided at the bottom of this page. Make sure to set your printer to A4 borderless option to print the full size template (the width of the bag is about 4"). Cut it out. Place the template on the wrong side of the fabric for the outer shell, pin it and trace it. Cut it out with 1/4" allowance.
Step 2: Unfold the cut out fabric, flip the template on to the opposite side, pin it and trace it.
Step 3: Repeat the same process for the inner shell. Use the same template for the interfacing, but cut it out without the seam allowance. Now you should have three pieces - outer and inner shells with 1/4" seam allowance and the interfacing without the seam allowance.
Step 4: Following the manufacture's instruction, apply the interfacing to the wrong side of the outer shell.
Step 5: Place the inner shell with the right side up, place the outer shell on top with the wrong side up. Align all the sides and corners and pin together. Mark an opening about 2" long on the left side of the bag (where the pen is pointing).
Step 6: Stitch all the way around from one mark to the next. Make sure to backstitch the beginning and end of your seam. Cut off the threads. Remove pins.
Step 7: Using small scissors, trim the allowance on the small side panels, cut off all the corners, clip small notches in the rounded part of the flap. Cut out small triangles in four corners (at the base of the side panels). Be careful not to cut through the seam.
Step 8: Using some tools (my favourite are a chopstick and a seam ripper), carefully turn the bag the right side out. It's a tricky step, take your time and be patient. Push all the corners out, use your fingers to straighten them out. Press well with a hot iron.
Step 9: Hand sew the opening closed.
Step 10: Using the template, mark two horizontal lines on the outer shell of the bag.
Step 11: Top stitch the marked lines and around the edge of the front flap about 1/8" away from the edge.
Step 12: Now comes the fun part - putting it all together. Bring the side panel to the back panel of the bag, align the sides and pin together. Do the same with the opposite side. Make sure that both tops of the side panels are on the same level just below the stitched line.
Step 13: Using your machine (though it can be done by hand also), stitch all the way from the top very close to the edge (no further that 1/8" away), lift the foot of your machine and turn the bag 180 degrees and stitch all the way up. Backstitch. Cut off the threads. Repeat with the opposite side.
Step 14: Repeat step 13 by bringing the side panels to the front panel now.
Step 15: We are almost done, just a few finishing touches are left. Pinch the front and back bottom edges with your fingers, pin them so you have a nice straight edge. Top stitch close to the edge (about 1/8" away) from one side seam to the opposite.
Step 16: You can use different types of closures - snap fasteners, buttons, elastic, two ribbons or one a wrap around ribbon that I am using for this tutorial. If you are using the same method, cut a piece of a ribbon long enough to wrap around your bag and to tie a bow. Mark the centre on the front flap and pin your ribbon about 3/8" from the edge. Stitch in place and you are done.
If you have any questions or comments, please do not hesitate to contact me by leaving a comment below or sending me an email. I would be glad to help. Happy sewing! Larisa xox
Note: Make sure to set your printer to A4 borderless option to print the full size template.


Larisa this little sweet bag is absolutely gorgeous! :) And thank you so much for the template, will definitely have to try this one out soon! x
ReplyDeleteAnn, thank you so much for your complement! I would love to hear from you if you get a chance to make one. Enjoy!
DeleteI've pinned this tutorial for future use. Thank you for this lovely project, Larisa.
ReplyDeleteDina, thank you very much for visiting! I hope you enjoy working on this project as much as I did.
DeleteJust found this Larissa. Will be trying it out. It's absolutely gorgeous, thanks for sharing,x
ReplyDeleteThank you for your complement, Carole! I am glad you like this tiny bag, it really is fun to make. Enjoy! :-)
DeleteHello Larisa. I love this little bag and can't wait to get started. Thank you for posting a tutorial❤️🪡🧵
ReplyDelete